
Y’all know how much I love me some bread! 🙂
And I really love Brioche!
It’s one of what I call my “fancy” breads.
Because this bread is so rich and buttery, I like to save it for special occasions.
Brioche is a bread that originated in France. It’s actually more pastry than regular bread.
It contains eggs, butter, sugar, and milk or cream. The traditional shape is a round loaf baked in a fluted pan with a smaller ball on the top.
Brioche is often sweetened up even more with fruit or chocolate, although this recipe is pretty plain by comparison to some that I have seen.
And of course I added sourdough. And then fiddled with it until I made it a no-knead bread recipe.
But it tastes just as wonderful as the non-sourdough, kneaded type. I promise!
I love to braid the loaves for a festive appearance and sometimes sprinkle them with poppy or sesame seeds.
If you want them to look even awesomer, which I usually do, you can make 3 double braided loaves.
And if you happen to have any left over the next day, this Brioche makes some pretty incredible French toast, if I do say so myself.
Gotta love it! Got your apron on? Let’s go!
Don’t have a sourdough starter? No problem, you can learn how to start one here.
Pin for later

No-Knead Sourdough Brioche
- 1 1/2 cups active sourdough starter
- 1 1/2 Tbsp sea salt

- 8 pastured eggs, slightly beaten
- 1/2 cup raw, unfiltered honey
- 1 1/2 cups melted butter
- 6 1/2 cups unbleached flour
- 1 1/2 Tbsp instant yeast (optional)
- 1 egg, beaten with 1 Tbsp of water for egg wash right before baking
This recipe makes 3 large loaves.
To make our no-knead Brioche dough, we’re going to use the “bucket dough” method.
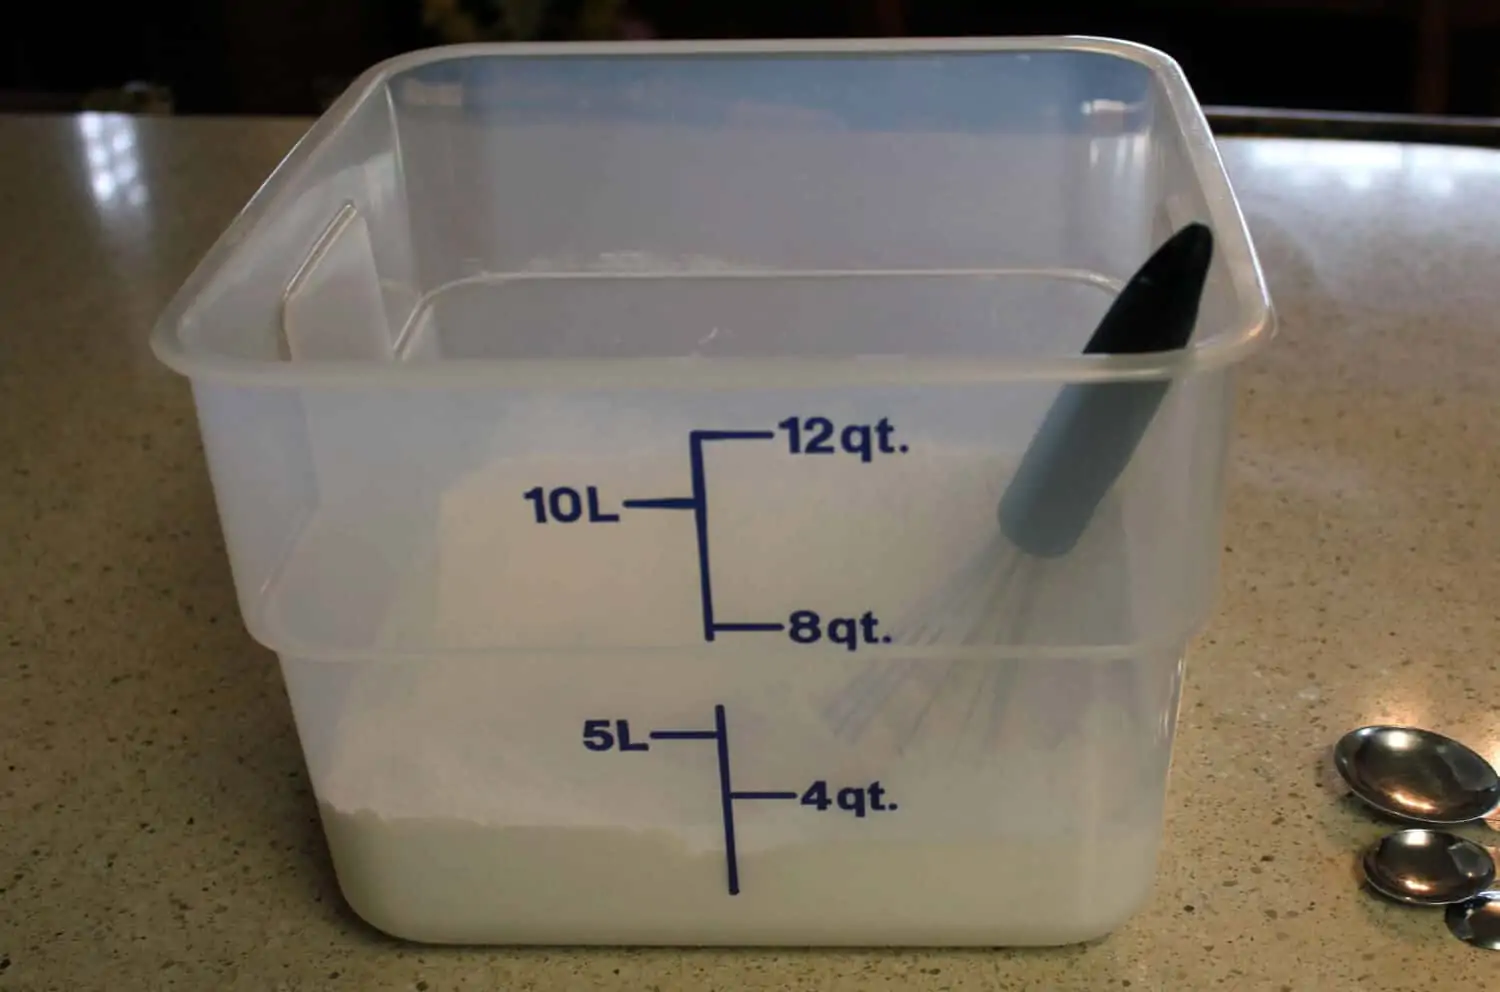
To start, thoroughly mix all your dry ingredients, including the instant yeast if you’re using it, in a large (5-6 quart) container.
I like to use a “dough bucket” like this one![]() . It has measurements on the side so I can easily see when it has doubled in volume. And it comes with a lid.
. It has measurements on the side so I can easily see when it has doubled in volume. And it comes with a lid.
my favorite dough bucket
Now you need to add all the wet ingredients to the dry ingredients and mix well without kneading. I start out mixing with my Danish dough whisk![]() .
.

here’s my fancy Danish dough whisk
But I usually end up using my hands to get the last bit mixed in well. If there are some small lumps of flour that is OK. They will not be in the finished product.
First Rise
Once everything is mixed up well, cover the bucket loosely and let the dough rise on the counter or table (or where ever you have room) until it has risen and then begun to deflate.
When I use the bucket, I leave one corner slightly up so that some of the gases from the yeast can escape. Otherwise, it could pop the top off the bucket! Which is a little startling…
If you are using only your sourdough starter as leaven, this first rise can take anywhere from 2 to 6 hours depending on the strength of your starter and the temperature of your kitchen.
If you are using the optional instant yeast, it will rise much quicker and only needs to rise for 2 hours before going into the fridge.

doubled and fallen
After the dough has risen and deflated, cover tightly and put it in the fridge for at least 8 hours. I usually let it chill out overnight.
The dough will stay good for about a week as long as it’s tightly covered.
Shaping
When you are ready to shape the dough, dust the surface of the dough with flour and remove however much you are going to use from the container. You don’t have to bake all of it at once.
If you just want one loaf, remove about 1/3 of the dough. I baked it all at one time, so that’s what you will see in the pictures.
This dough will be sticky, so make sure you have flour on your hands, too.
Now, divide the dough into 3 equal pieces if you are making single loaves, or 4 pieces if you are making double loaves.
Take one of those pieces and divide it into 3 pieces.

dough divided into 3s
Roll each of those last 3 pieces into ropes on a lightly floured counter. They should be about 18ish inches long.
Butter your cookie sheet and lay the 3 ropes side by side down the center.

dough ropes on buttered cookie sheet
Starting in the middle, braid the ropes to one end and pinch the ends together.

braiding from the middle
Turn your cookie sheet around, flip the braid over onto it’s back and continue braiding down the other way til you reach the end. Pinch those ends together as well.
Now tuck those pinched together pieces neatly under on both ends.
Make a second and third braid the same way.
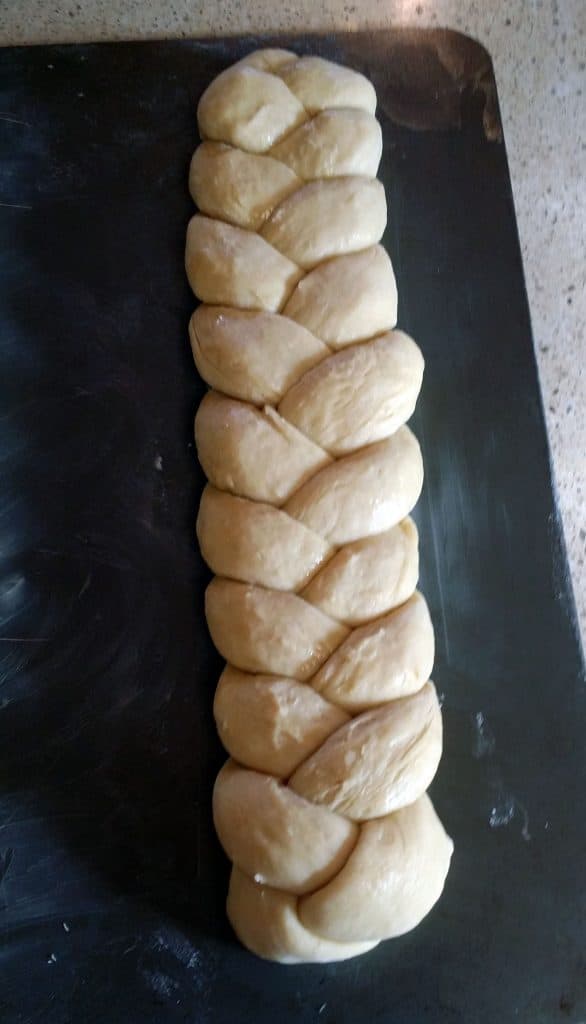
beautifully braided brioche
If you are making double braids, take the 4th piece and divide that into 3 pieces. Then divide each of those pieces into 3 more pieces.
Make the braids as before and gently place one small braid on top of each large braid, using an egg wash to stick them together.
For the egg wash, beat 1 egg with 1 Tbsp of water.
2nd Rise
After you have all 3 braided loaves ready to go, cover them loosely with a damp cloth and allow them to double in size.
If you are using a baking stone, you will need to preheat your oven for 20 minutes before putting the bread in the oven.
Right before you pop them in the oven to bake, brush the tops and sides of the loaves with an egg wash.
Now, sprinkle with poppy seeds or sesame seeds if you wish. I personally like the poppy seeds. 🙂

egg washed and poppy seeded
Bake those beautiful braids in a 350°F oven for 25 to 35 minutes. The time will depend on the size of your loaves.
You will know they are done when the crust is a beautiful golden brown and the center of the braid offers a little resistance to pressure when you poke it.
If they’re not quite there after 35 minutes, let them go a little longer. But keep an eye on them so they don’t get too dark.
After you take them out of the oven, put them on a cooling rack and try not to cut into them until they’ve cooled. So very hard to do!
Blessings!
This is just a little bit of buttery heaven and perfect for any gathering! What special bread has a place on your celebration table?

Sourdough No-Knead Brioche
Ingredients
Bread Dough
- 1 1/2 cup sourdough starter bubbly and active
- 1 1/2 Tbsp sea salt
- 8 large eggs
- 1/2 cup honey
- 1 1/2 cup butter melted
- 6 1/2 cup unbleached flour
- 1 1/2 Tbsp yeast (optional)
Egg wash & garnish
- 1 large egg beaten
- 1 Tbsp filtered water
- poppy or sesame seeds to sprinkle on top (optional)
Instructions
Making the dough
- Thoroughly mix all dry ingredients in a large (5-6 quart) container. Add the wet ingredients and mix without kneading.
- Cover and let rise on counter until the dough has risen and then deflated.
- Put the dough in the fridge for at least 8 hours.
Shaping the loaves
- When you are ready to shape the dough, dust the surface of the dough with flour and remove from the bowl.
- Divide the dough into 3 equal pieces.
- Take one piece and divide into 3 pieces.
- Roll each of those pieces into long, thin ropes on a lightly floured counter.
- Butter your cookie sheet and lay the 3 ropes side by side down the center.
- Starting in the middle, braid the ropes to the end.
- Turn your cookie sheet around, flip the braid over and continue braiding down the other way til you reach the end. Tuck the ends neatly under.
- Make a second and third braid the same way.
- Cover loosely with a damp cloth and allow to double in size.
- If you are using a baking stone, you will need to preheat your oven with the stone in it for 20 minutes before putting the bread in the oven.
- Right before baking, brush the tops and sides of the loaves with an egg wash made with 1 beaten egg and 1 Tbsp of water. Sprinkle with poppy or sesame seeds if you wish.
- Bake in a 350 degree oven for 25 to 35 minutes depending on the size of your loaves.
- You will know it's done when the crust is a beautiful golden brown and the center of the braid offers a little resistance to pressure when you poke it.
- Put on a cooling rack and try not to cut it until it's cooled.
Notes
Nutrition
More amazing things you should bake:


Gary davis says
I hope you answer my message cause I would like to try this! On the first rise…let it rise and deflate…this could take from 2-6 hours? It seems to be contrary to what I am used to doing. Then it reads if you are using optional yeast let it rise for 2 hours… I guess without deflating? Kinda confused.
Cery says
Hi Gary! Thanks for your question. I went in and edited some to try to make it less confusing. 🙂
If you are using only the sourdough starter and not the additional yeast, it could take up to 6 hours to rise. The longer time frame might be necessary if your starter isn’t strong or your kitchen is cool. You will know it has risen as much as it’s going to when it begins to deflate.
Using the optional yeast, the dough will already begin to deflate after the 2 hours.
I hope that cleared up the confusion for you! Let me know how you like it.
Blessings!
Pauline says
Thank you so much for this! All the recipes I had found looked scary complicated. I tried this today and it was so easy and so incredibly delicious!
Cery says
Hi Pauline! I’m so glad you liked the recipe! And yay for easy! 🙂
Colleen says
Do you use all purpose flour or bread flour? A
Cery says
Hi Colleen! You can use either one. I usually use all purpose because that’s what I generally have on hand. 🙂
April says
What hydration level is your sourdough starter you’re using for this? Mine started at 50%, now it’s at 75%, but a lot of recipes I see call for 100% or even 120% hydration starter.
Cery says
Hi April! That’s a very good question! I actually don’t pay any attention to hydration level. I stick with the amounts of flour and water I wrote about in my Sourdough 101 posts and developed the recipe with that starter. But I don’t know what the hydration level is. I know that is not at all helpful, and I’m really sorry about that. 🙁
Blesings!
Angela says
Do you know what the ingredients are in terms of weight? Particularly for the starter
Cery says
Hello Angela! I do not know, actually. I have never weighed the ingredients. I’m very sorry I couldn’t help you with that. 🙁
Blessings
Kristie says
Is the lack of milk in this recipe due to the amount of water in already in your starter and because you’re using liquid sweetener (honey) instead of granulated?? Thanks ☺️
Cery says
Hi Kristie!
The amount of other liquid is one of the reasons there is no milk. The other is that this dough can stay in the fridge for about 2 weeks, and milk might not still be good after that amount of time. 🙂
Alastair Young says
This recipe worked a treat for me!
See http://imgur.com/gallery/XnRIj5i
Cery says
Hi Alastair! Wow, those look great! I’m so glad you liked the recipe. Thank you for sharing the pics! Blessings.
Meghan Bennett says
Hi! I made a two thirds recipe and made two loaves. I used yeast in the recipe, and on the second rise the dough started splitting and tearing. The bread turned out quite ugly. Any suggestions on what might have gone wrong?
Cery says
Hello Meghan! That’s a great question! Usually when that happens it’s because the bread wasn’t needed enough. Kneading helps the gluten become more elastic. Next time, try kneading it longer. You can use the windowpane test to check how much stretch the dough has. Take a small piece of the dough and stretch it slowly. If it stretches enough that you can see through it, it should be good to go. If not, knead a little more. You can see that in action in this video:
Jami says
Love the recipe! But 2nd attempt at making it was much much wetter, probably due to using a different sourdough starter. Was looking for tips and in this post you mention needing to knead the dough, which I thought we were supposed to avoid doing. Should I be adding flour and kneading when I shape my loaves?
Cery says
Hi Jami!
It’s not uncommon for the dough to be a little inconsistent with different starters. Or even sometimes with different flours.
If the dough is too wet, you can absolutely add in some more flour. If you add more than the dusting when you take it out of the bucket to work with, you may need to knead it in order to work it in.
Hope that helps!
Cery
Nadia says
Hello!
Does the brioche taste a little sour in this recipe?
I like the fact you use the natural power of gluten formation instead of a human one 🙂
Thank you for the inspiration!
Cery says
Hello Nadia. The brioche doesn’t taste sour at all. Blessings!
Kat says
Any idea approximately how long the second ride might be?
Also, has anyone had success doing the version without yeast? Started it yesterday, and it never seemed to fully rise (even after 12+ hours), so I’m not sure how it will turn out in the end, but was just curious about other people’s experiences.
Thanks so much for sharing your recipe!
Cery says
Hi Kat! There are so many things that could affect the rise, it’s hard to say. If you have a healthy starter that’s been around for a while the rise will be shorter. The temperature in your kitchen will affect the rise time as well. Even the brand of flour you use will have some effect. For the best results without added yeast, using a bread flour instead of all purpose should give you a better rise.
Blessings!
Pat P says
Can you replace the honey with white or brown sugar?
Thank you! looking forward to making this
Cery says
Hello Pat!
Yes, absolutely! You can replace the honey with either white or brown sugar. The brown sugar will caramelize faster, so when you bake it you might need to tent it so it doesn’t get too brown.
Vic says
Hi, made this yesterday for the first time and it came out delicious and beautiful. It reads 2 loaves, but the recipe gives instructions for 3. I would make 2 next time though as three came out smaller than I would have liked. Couldn’t find my sesame seeds so substituted everything bagel seasoning and the garlic was kind of a yummy twist. Next time I’d add more honey and then use plain sesame seeds and I think it will be more challah-like. I used yeast and sourdough starter and the dough doubled well. As a gauge, I’d give the second rising after braiding at least 3-4 hours.
Cery says
Hi Vic!
I’m so happy you enjoyed it! That everything bagel seasong sounds like a stroke of genius!
Cery
Melissa says
Do you have to place it in the fridge before shaping, or can you shape it, let rise, and bake it after the first rise is complete?
Cery says
Hi Melissa!
The dough would have to be kneaded if you didn’t put it in the fridge first. That long refrigeration is in place of the kneading.
Cery
Marsha says
so glad i read thru the comments first to find out if refrigeration could be skipped! i’m going to knead thoroughly before the first rise then. hope it turns out!
Cery says
Hi Marsha!
Kneading before the first rise should do the trick!
Cery
Julie says
I’m wondering if this would be a good dough to use for brioche-style cinnamon rolls or pecan buns? Have you ever tried this?
Cery says
Hello Julie!
I have not tried that actually. But it sounds like a wonderful idea. I’m sure it would turn out amazing!
I’m going to put that on my list of things to try. In the meantime, give it a go and let us know how it goes! 🙂
Cery
Mallory says
This recipe is my go to now! So delicious. I have a new-ish (<6 mo) starter so the only time it didn’t turn out was when I didn’t add the dried yeast in addition. Even then it tasted wonderful, just more dense than I’d prefer. 🙂
Cery says
Hey Mallory!
I’m so glad you are enjoying it! It’s one of our favorites, too!
Cery
Roberta Brewer says
Hi started this last night…when my dough came out of the fridge it was very cold, a little stiff (the lid had popped partially and I didn’t catch that, and a little craggy looking. was my fridge too cold? also i don’t think it had started to deflate yet when I put it in the fridge but it had been on my counter for 6 hours and was already midnight and I didn’t want to stay up all night waiting for it to deflate. I did separate the dough in two pieces and kneaded one for a few minutes to warm it up and get the gluten going just in case and it did loosen up. It’s been braided and is resting for it’s second rise right now so I thought I’d pop in and ask Any suggestions or guidance on why what happened did? we’ll see how it turns out after baking. it did get a bit sticky and much more supple after kneading so I’m hopeful worked
Cery says
Hey Roberta!
I don’t think the fridge was too cold. But the top popping might have dried it out just a touch.
Sounds like the kneading was just what it kneaded, lol!
Let me know how it goes!
Cery
Heather says
It says at the start of the recipe it makes 2 loaves but in the instructions you seem to be making 3. I definitely don’t need 3.
Cery says
Hey there Heather!
You don’t have to use all the dough at the same time. The bucket dough will last about 1 and a half to 2 week in the fridge. It also freezes well if you don’t think you’ll get to it all in time.
Cery
Maggie says
Can you use this dough to make rolls? I’d love to make one loaf and a big batch of rolls.
Cery says
Hello Maggie!
Yes, this dough is great for rolls! I often do that very same thing.
Bake the rolls at 350°F for 15-25 minutes depending on how large you make them. They will be a beautiful golden brown.
And I like to brush melted butter over the tops when they are done.
Cery
Cery
Lily Greenisway says
Thanks for the recipe! It’s easy and works. I am a novice bread baker and made the best tasting and fluffiest bread ever in my first attempt. I reduced the recipe by a third and added yeast, so it rose fully in just 2 hours. I like it that it’s not too sweet, yet tastes heavenly. Though, I made a twist by using softened butter not melted, adding it after the dough was formed. Hubby gave the thumbs up and helped me video the bouncing bread before finishing the whole loaf lol.
Cery says
Woo Hoo Lily!
So happy that you guys loved it so much!!
Cery
Laura Turner says
I just made the dough…let’s see if there is enough to bake. We are eating the dough! It’s so good! I can’t wait to taste the bread!
Cery says
Laura, LOL
You should try making doughnuts out of it! It’s pretty awesome!
Cery
Helene says
My dough was very stiff…not sticky at all after the overnite fridge….i braided it …it did not rise. Maybe i should have kneaded it ???? Can i knead it now and try the second rise again….or would i have to go back to the fridge step again….or is it just a flop??? I was very excited to try this, so am disappointed after reading all the first timer successes.
Cery says
Hi Helene!
It could be that it was too cold to rise perhaps?
If it was not sticky after the fridge, was the lid sealed tightly?
It’s so hard to troubled shoot without being there. But I would say to go ahead an knead a little bit of water into it. Maybe just a tablespoon and see if it softens up a little. If there isn’t enough moisture if won’t rise. If that seems to be helping you can add a little more water until it feels like a regular bread dough.
I hope that helps!
Cery
Helene says
Cery…..thank you for your response…i decided to just follow through on the recipe since it already partially rose rather than fool around with kneading at this point and possibly ruining it. It turned out pretty good…just a tad bit denser that i would have liked but very edible. Next time i will possibly knead some after the rise….should i do that after the counter top rise or after the fridge rise? And i will make sure the fridge rise has a well sealed top. I would send photos if i could figure out how…it looks pretty nice for my first attempt. I am fairly new to sourdough baking.,,, have made a few things and this was my first problem. Thank you!
Brittan says
Hi , I just did the recipe and had the same thing happen. My fridge ends up being a lot colder than most and my last couple recipes the dough will get very hard in the fridge. What I did this time was put the dough in the divided amounts on a plate in the Oven and then added another tray I put boiling water in. I let this steam warm up the dough and start activating the yeast again. It helped for me since I left it out at room temperature and it had not risen at all. Hope this helped!
Cery says
Hi Brittan!
Thanks for sharing that tip! You can also add just a touch less flour (maybe 1/4 cup) next time you make it and see if that helps any.
Blessings!
Cery
Kimberly says
This bread was so delicious! Has anyone tried to turn the recipe into hamburger buns?
Cery says
Hi Kimberly!
I have not tried that. Yet. lol
But I bet they would be awesome!
Cery
Rachael says
I currently have my first loaf in the oven and it smells DIVINE! It looks pretty dang good, too. I can’t wait to try it! I opted to split the dough in half to do a double loaf. So I still have half of the dough remaining. Do you think this dough would work well for the star style brioche that uses layers and twists? I’m SO tempted to use the second half and experiment!
Cery says
Hi Rachael!
I’m glad you found the recipe. Sorry I didn’t catch your question sooner.
I think it would work great for that! Did you try it? How did it go?
Blessings!
Cery
Suzanne says
This looks so good! What a simple way to make bread into something special!