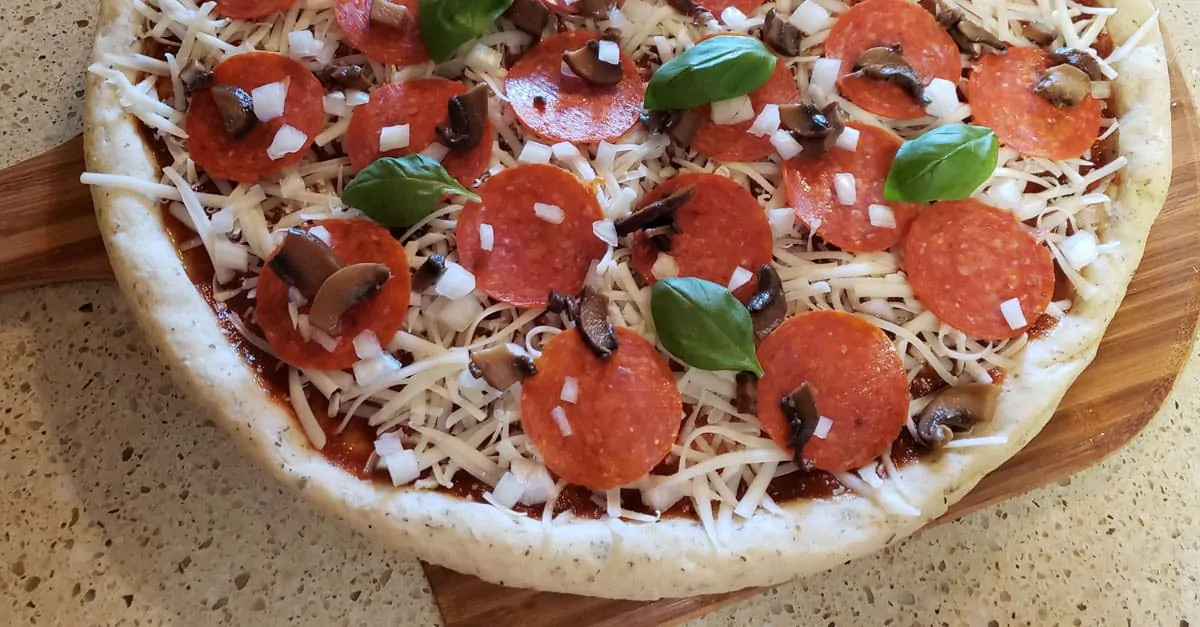
Who doesn’t love pizza, all hot and gooey, fresh from the oven?
Thankfully, there are as many different kinds of pizza as there are people.
At my house, some of us like it thin and crispy. Some like it deep dish style.
Some of us like mushrooms and onions. And some just want it plain.
If that’s the case at your house too, making large pizzas can sometimes become way too complicated. And who needs that?
So, to make pizza night a success, I often use individual pans and make the sourdough crust ahead of time. Some thick and some thin.
That way everyone gets to build their own pizza exactly the way they like it.
I will even double the recipe at times so that I have left over crusts to freeze. You can freeze them as is, or build the pizza first and then freeze them.
Either way, sourdough pizza crust is a way healthier alternative to most frozen pizzas you can buy at the grocery store.
So I am going to teach you how to make the Ultimate Sourdough Pizza Crust!
Don’t have a sourdough starter yet? Grab a copy of my eBook “Learn How to Create a Sourdough Starter” and get yours going today!
As with all my sourdough recipes you can omit the yeast and allow the sourdough pizza dough to rise much more slowly and develop more of a tang.
Make sure that your starter is active and bubbly if you are not using yeast.
If you want to use this recipe with discard starter you will need the yeast.
One last thing before we get started. I pre-bake the crusts and then remove them from the pans.
Then I let them cool on the racks to put together later, or we build the pizzas right away.
But either way, when I bake the pizzas with the toppings, I always use my baking stone.
This baking stone is the one I recommend for pizza.![]() It pulls the moisture away from the crust and makes it nice and crisp.
It pulls the moisture away from the crust and makes it nice and crisp.
Which is the way I like my pizza crust.
If you like your pizza crust on the chewy side, put them back in the pan after you build them.
Ready?
Here we go!

Sourdough Pizza Crust
- 1 cup unfed sourdough starter (discard)
- 1/2 cup warm water
- 2 1/2 cups unbleached flour
- 1 tsp salt
- 1 tsp yeast
- 4 tsp Italian seasoning (optional)
Toppings for pizza
- homemade pizza sauce, Alfredo sauce, or pesto
- Feta cheese, Pepper Jack cheese, Mozzarella cheese, or cheese of your choice
- mushrooms
- onions
- peppers
- canned hamburger, pepperoni, summer sausage, canned chicken, or other meat of your choice
- fresh herbs like basil, thyme, oregano, or rosemary
Making the Dough
To start with you need put the flour, salt, yeast, and the Italian seasoning into a mixing bowl and mix it up.
Then stir your sourdough starter and measure out 1 cup into the bowl and add the 1/2 cup warm water.
Mix well until combined. You can mix it either by hand or with a stand mixer.

ready to mix it up
If you are making it by hand, turn the pizza dough out onto a lightly floured surface.
Knead until the dough is smooth and slightly sticky. About 10 to 12 minutes.
If using a stand mixer, attach your dough hook and knead for about 7 minutes until smooth and just a tad bit sticky.
After kneading, you need to put the dough back into a greased bowl and turn it to grease the top. It needs to rise until it has doubled in volume.

kneaded and ready to rise
Depending on how strong your starter is and how warm your kitchen is, the rise time can be anywhere from 1 to 3 hours.

and now doubled in volume
Now your sourdough pizza dough is ready to rock and roll!
How many crusts does this make?
If you want a deep dish pizza, use all the dough for a single pizza and press it into an olive oiled pan.
For regular sized thin crust pizzas, divide the dough in thirds. If you want a little thicker crust, divide in half.
If you have individual sized pans you’ll need less dough for each crust.
Since there are so many different sizes of pans I can’t really tell you how much you might need. You’ll just have to experiment for yourself.
I can tell you that I get 6 thin crust mini pizzas with the pans that I have. If someone wants a mini deep dish, I take twice as much dough as I use for the thin crust and that works well for me.

into the oiled pizza pan
Drizzle olive oil into your chosen number of regular sized pizza pans and tilt the pans (or spread the oil with your hands) until the bottoms are evenly coated with oil.
Shape each piece of the dough into a disc and then put each disc into a pizza pan. Gently press the dough out until it covers the bottom.
It will start to shrink up a bit. That’s ok.
Let it rest for a few minutes and press it out again. Do that for all of the pizzas.
Once you have the crusts in the pans, take a fork and poke holes all over them. These holes keep the crusts from bubbling up as they bake.

poked all over and ready for the oven
Then cover them and let them rest while the oven preheats.
Preheat your oven to 450°F. If you are going to be baking your pizzas to eat right away, put your baking stone in the oven to heat up.
Baking your sourdough pizza crusts
Once your oven is hot, pre-bake the thicker crusts for 8 – 10 minutes and the thin crusts for 4 to 6 minutes.
Remove from the pans and cool on a wire rack for later, or top immediately with all your favorite fixins.
When you are ready to bake your pizzas, slide them into the oven and onto the preheated baking stone.
I’ve found that using a pizza peel is the best way to get these guys safely into and out of the oven.
This is the pizza peel that I use![]() , and I love it!
, and I love it!

I love this pizza peel
Bake until the toppings are hot and the cheese is melted and browned to your liking.
Approximately 10 minutes for the thicker crust pizza, and 8 minutes for the thin crust pizza.
Let cool slightly before serving. It would be so sad if y’all got blistered tongues!
Here’s some more delicious sourdough discard recipes for you:


Sourdough Pizza Crust
Ingredients
- 1 cup unfed sourdough starter discard
- 1/2 cup warm water
- 2 1/2 cups unbleached flour
- 1 tsp salt
- 1 tsp yeast
- 4 tsp Italian seasoning optional
Instructions
- To start with you need put the flour, salt, yeast, and the Italian seasoning into a mixing bowl and mix it up.
- Then stir your sourdough starter and measure out 1 cup into the bowl and add the 1/2 cup warm water. Mix well until combined. You can mix it either by hand or with a stand mixer.
- If you are making it by hand, turn the pizza dough out onto a lightly floured surface. Knead until the dough is smooth and slightly sticky. About 10 to 12 minutes.
- If using a stand mixer, attach your dough hook and knead for about 7 minutes until smooth and just a tad bit sticky.
- After kneading, you need to put the dough back into a greased bowl and turn it to grease the top. It needs to rise until it has doubled in volume.
- Depending on how strong your starter is and how warm your kitchen is, the rise time can be anywhere from 1 to 3 hours.
- Divide your dough into your chosen number of crusts.
- Drizzle olive oil into your chosen number of regular sized pizza pans and tilt the pans (or spread the oil with your hands) until the bottoms are evenly coated with oil.
- Shape each piece of the dough into a disc and then put each disc into a pizza pan. Gently press the dough out until it covers the bottom. It will start to shrink up a bit. That's ok.
- Let it rest for a few minutes and press it out again. Do that for all of the pizzas.
- Once you have the crusts in the pans, take a fork and poke holes all over them. These holes keep the crusts from bubbling up as they bake.
- Cover the crusts and let them rest while the oven preheats.
- Preheat your oven to 450°F. If you are going to be baking your pizzas to eat right away, put your baking stone in the oven to heat up.
- Once your oven is hot, pre-bake the thicker crusts for 8 - 10 minutes and the thin crusts for 4 to 6 minutes.
- Remove from the pans and cool on a wire rack for later, or top immediately with all your favorite fixins.
- When you are ready to bake your pizzas, slide them into the oven and onto the preheated baking stone.
- Bake until the toppings are hot and the cheese is melted and browned to your liking. Approximately 10 minutes for the thicker crust pizza, and 8 minutes for the thin crust pizza.
Kayla says
Hi! Have you tried making this a day in advance? I’m wondering at what step I could stick in the fridge?
Cery says
Hi Kayla,
You can really put it in the fridge at any stage, either right after kneading or after the first rise and it’s in the pan. You could also pre-cook it for about 5 minutes and then toss it in the fridge overnight.
Pre-cooking will give you less of the “sour” flavor than an overnight rise in the fridge. But I’m not sure there would be that much of a difference.
Hope that helps!
Cery
L says
If you omit the yeast do you still add the water?
Cery says
Hi there! Yes, you still need to add the water.
Cery