Pressure canning is a great way to preserve vegetables and meat, but it can be intimidating. This is part 3 in a series of home canning articles that are designed to take the overwhelm out of filling your canning pantry.
You can go here to read the first article, Home Canning Basics: How to Safely Can Food at Home.
And here is part 2 all about waterbath canning, Waterbath Canning: Everything You Need to Know From Prep to Processing.

Let’s discuss the details of pressure canning. A lot of the information here is the same as the information on water bath canning, but a lot of it is not.
Types of Pressure Canners
Pressure canners come in 2 different types. Dial gauge canners and weighted gauge canners.
The dial gauge canner has, as you would assume, a gauge on the lid that shows the psi (pounds per square inch) of the pressure inside the canner. You have to regulate the heat under the canner to maintain the correct pressure during processing.
The experts that the National Center for Home Food Preservation recommend that you have the gauge checked every year for accuracy. You can generally have that done at your local extension office for little or nothing.
If the dial is within 2lbs of the correct pressure, go ahead and use it. Just make sure you compensate for the difference.
Any difference greater than that, and the experts recommend that you replace your gauge.
The weighted gauge canners have weights for 3 different levels of psi, 5lbs, 10lbs, and 15lbs, which fit over the air vent tube. Some of the older ones have 3 separate weights, while most of the newer ones are all in one piece.
When the indicated pressure has been reached, the weight begins to “jiggle” or “rock” and release the excess pressure. You still need to regulate the heat source to maintain a steady rocking.
The dial gauge canners aren’t self-regulating when it comes to pressure, but the weighted gauge canners don’t have the smaller increment measurements.
To get the best of both worlds, you can purchase a weighted gauge for your dial gauge canner.
Pressure canners also differ in the way the lids seal.
Some have a rubber gasket between the pot and the lid, and some are just metal on metal. The rubber gasket has to be replaced on occasion when the rubber becomes hard or brittle.
Both of these differences have their pros and cons, but in the end they all do the same thing. I kinda see it as a Ford/Chevy type thing.
There are those who say they would “never” use a certain type of canner. I say use what you have or can get your hands on.
I personally have a dial gauge, rubber gasket canner. I’ve used it for going on 25 years now. I get the gauge checked every year, and I’ve only had to replace the gasket a hand full of times. And those gaskets cost about $8. The only regret I have is that it isn’t bigger.
Note on Pressure Cookers
While most pressure canners can be used as pressure cookers, the reverse is not true. Pressure cookers like instant pots were never designed to hold a precise pressure for an extended length of time.
The experts recommend that you do not use your pressure cooker to can food at home, no matter what the little book that comes with it says.
Parts of a Pressure Canner
There are 3 basic pieces to a dial gauge pressure canner:
- Pot
- Rack
- Canner Lid
- Pressure Dial Gauge
- Pressure Regulator
- Steam Vent Pipe (or Petcock)
- Air Vent/Cover Lock
- Overpressure Plug
- Sealing Ring

There are also 3 basic pieces to a weighted gauge pressure canner:
- Pot
- Rack
- Canner Lid
- Weighted Pressure Regulator
- Steam Vent Pipe (or Petcock)
- Overpressure Plug
- and, occasionally, a Pressure Dial Gauge

Pressure canners come in different sizes ranging from a 10 quart model that holds 7 pint jars or 4 quart jars all the way up to a 41 quart model that holds 32 pint jars or 19 quart jars. A size for every job for sure!
How it Works
Basically speaking, during processing the small amount of water in the canner becomes steam which causes the pressure to rise inside the canner. The higher pressure causes an increase in temperature.
The heat inactivates enzymes in the food, kills microorganisms, and creates an airtight seal.
Pressure canning can be used for both high acid food (with a pH of 4.5 or lower), and low acid foods (with a pH of 4.6 or higher). So, anything that you can process in a waterbath can also be processed in a pressure canner.
But it doesn’t work the other way. In fact, if you don’t currently own a canner, I would suggest getting a pressure canner first. They are more expensive, but they are way more versatile.
And, because they are a big pot and have a rack in the bottom, you can also use them as a waterbath canner.
Does Acidity Matter in a Pressure Canner?
Acidity matters in a water bath canner because botulism spores are very common. They are in the soil and on fruits and vegetables and other foods.
The spores don’t cause people any harm. However, when the spores become active they produce the toxin that causes botulism poisoning.
Spores become active in low acid, oxygen free environments. Like inside a sealed jar of low acid food. The heat from a waterbath canner isn’t sufficient to destroy the spores, so the foods must be high acid to keep the spores inactive.
High acid foods are things like fruit, jams, and pickles.
However, the heat produced in a pressure canner is significantly higher than what you can generate in a waterbath canner, and is sufficient to destroy botulism spores.
Because of that, acidity is not a safety consideration in pressure canning so you can process low acid foods like potatoes, green beans, beef, poultry, and seafood.
Heat
Now let’s talk about what happens when your jars are in a pressurized pot with a small amount of boiling water.
As the water boils it heats up the liquid in the jar and causes it to boil, too. Vegetables, fruits, and berries have within them enzymes that cause them to ripen.
These same enzymes cause the foods to continue ripening until they are no longer edible. The heat of the boiling liquid inactivates these enzymes so the food in the jars doesn’t start to decay.
There are also molds, yeasts, and bacteria on the foods. And while that is completely normal, you don’t want to give them an environment where they can proliferate.
The good news is that the heat from the boiling liquid destroys all these little beasties so they don’t grow inside your jars.
As the liquid boils inside the jars it also forces air out of the jar.
The resulting vacuum is what creates the air tight seal between the lid and the rim of the jar. That seal keeps all the aforementioned beasties from getting back into the jar and doing bad things.
All of this is the same as a waterbath canner.
Difference Between Pressure Canners and Waterbath Canners
Here’s the difference in a pressure canner. The 2 or 3 inches of water in the bottom begins to boil and produces steam.
You allow the steam to exhaust from the air vent tube for a specified length of time. As the steam is exiting the canner it causes a partial vacuum which raises the air pressure inside the canner.
The higher pressure causes the contents of the canner to heat to a higher temperature. It is this higher temperature that destroys the botulism spores that could cause illness or even death.
Here’s the science-y stuff behind that. We all know that water boils at 212°F, right?
Sort of.
Water only boils at 212°F at sea level or close to it.
For every 500 foot increase in altitude, water boils at about 1°F less. This change is caused by atmospheric pressure which is measured in psi.
Put simply, the higher you go, the less oxygen there is and the lower the psi. So, to get things hotter than boiling point (212°F), you have to raise the psi.
Pressure canners are designed to have an internal temperature of 240°F when properly used, which is high enough to make most foods safe to eat.
Altitude
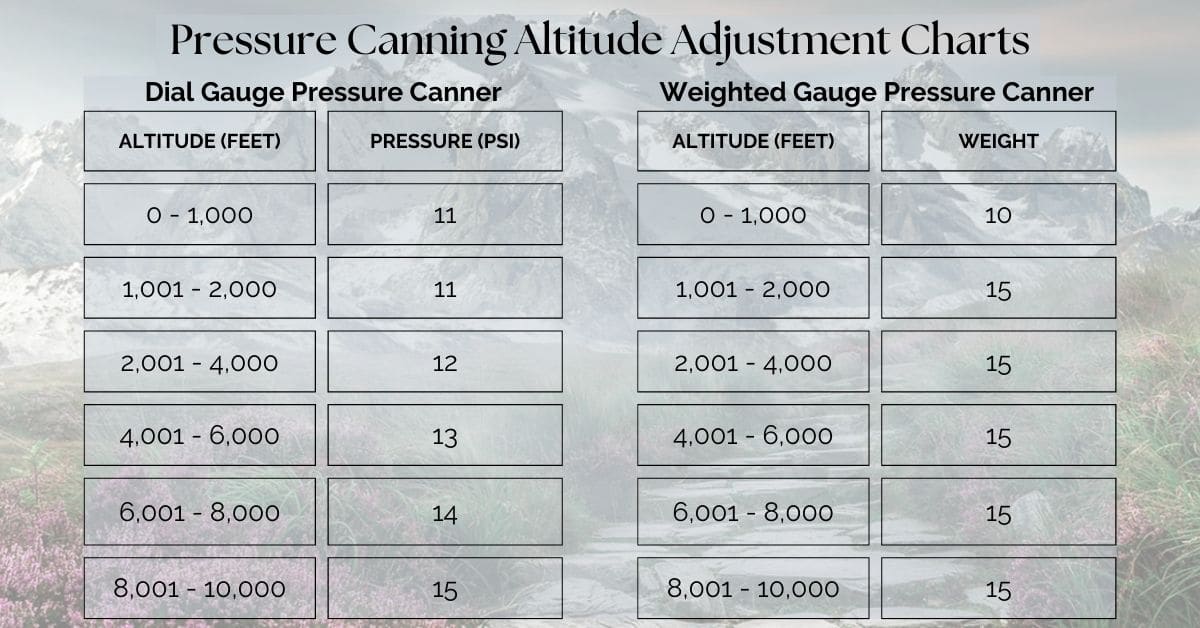
As we just discussed, because water boils at different temperature depending on altitude, you have to process things at a higher pressure at higher elevations.
All canning recipes are written for sea level or below 1,000 feet above sea level. If you do not live at that altitude you have to adjust your processing times according to the altitude chart below.
Because having the right altitude is just as important as having the right attitude!
Note that for pressure canners, there are 2 charts. One for dial gauge canners and one for weighted gauge canners.
Cold Pack vs. Hot Pack
Most recipes will tell you if the item you are canning should be cold packed or hot packed, although sometimes you have a choice.
When you cold pack something, you pack the raw food into hot jars. You then pour boiling liquid like syrup or broth over the food leaving the required headspace.
Hot packed foods are heated first and then put into the jars. Boiling liquid is again added leaving the proper headspace.
Hot packing is usually recommended if you have the option. Precooking allows the food to shrink so you can put more in the jar.
But food is a little more fragile after cooking, so pack the jar carefully.
Be sure to follow the directions for how tightly to pack the foods as well. Some foods shrink, so these will be packed tightly.
But some foods expand, like starchy vegetables, and need to be packed loosely.

Jar Sizes
The size of your jars will also determine the length of time to process. Quart jars will generally need more time than pints which are the two most common sizes listed in recipes.
If you are using smaller jars like half pints or 4 ounce jars, use the processing time for pints.
One and a half pint jars would need to be processed the same length of time as quarts.
Half gallon jars are no longer recommended for canning anything other than grape juice and apple juice.
Many recipes will give you options for what size jars to use. Think about not only how many people you will be feeding at a time, but also what the product is.
I’ll can chili in quart jars for the whole family, and also in pint jars for just 1 or 2 people.
Pizza sauce goes in 1/2 pints as does pickle relish.
Look at some bottles and jars in the grocery store to give you an idea of what sizes to use.
Headspace
Headspace is the amount of room left between the top of the jar and the food. This amount will vary depending on what you are processing.
The space allows the liquid to boil and the food to expand without losing any of the liquid from inside the jar. If there is not enough headspace left some of the liquid will boil out and all the food in the jars won’t be covered.
That won’t cause anything to spoil in storage but it could turn dark on the top, which isn’t very appetizing.
Pretreatments
Pretreatments would be things like soaking for beans, dipping fruits in citric acid to preserve color, pricking the skins of fruits so they don’t split, or blanching.
Always follow the directions for pretreatments. You will end up with a better tasting and better looking product.
Now that we know how stuff works, let’s move on to the doing!
The Process
The basic process is as follows:
- Wash your jars and keep them hot
- Prepare your lids as directed by the manufacturer
- Pretreat the food (if necessary) and prepare it for canning
- Put proper amount of water in canner (usually 2 – 3″)
- Fill the jars
- Attach jar lids
- Place jars in canner
- Lock lid in place
- Exhaust air for specified length of time
- Place regulator on lid
- Bring canner up to pressure
- Process for time required
- Remove from heat and allow to cool
- Release lid
- Remove jars from canner with a jar lifter
- After 12 hours check seals
Now that we know how stuff works, let’s move on to the doing! As an example of the process, this is how I would can my Spiced Plums in my dial gauge pressure canner.
When you are canning, the trick is to get your jars, your lids, your food, and your canner all ready at the same time. After you have done it once or twice it’ll go just like clockwork.
I wash and heat my jars in my dishwasher. I know that it takes about an hour and a half for it to get to the heated dry cycle. And I also know that the jars will stay hot for another 30-45 minutes.
So that gives me lots of time to prepare whatever I’m canning. Except for tomato saucy-type things. Those have to boil down so they take a while longer.
Pre-Process
First, I would put the number of jars the recipes says I need in the dishwasher and turn it on. I usually add 1 or 2 extra jars just in case I need them. In this case that would be 5 for the recipe, so I’ll wash 7.
Then I’ll measure all my syrup ingredients into the stockpot so it’s ready to go. Next, I’ll put the rings and new lids in a Dutch oven so I know where they are when I need them.
About 15 minutes before the dishwasher hits the dry cycle I’ll wash the plums, cut them in half, and remove the pits and stems. Then I’ll start heating the syrup.
When it comes to a boil I’ll reduce the heat and simmer for 10 minutes. I’ll fill the Dutch oven that the lids and rings are in about 2/3 full of water and add a splash of white vinegar.
The vinegar just helps to cut any residue from the water. Those go on the heat until it boils then I turn the water off.
Processing
Once the dishwasher hits the dry cycle I put the plums in the syrup. While the plums are heating I’ll get the jars out of the dishwasher.
I use a sturdy pizza pan to put the jars on. It makes it easier to carry the jars to where I need them and contains any mess I might make when I’m filling them.
When the syrup comes back to a boil, I take it off the heat.
I pack the plums into the jars leaving 1/2″ headspace.
Then I fill the jars with the boiling syrup to cover the plums. I make sure the air bubbles are out and top off with syrup if I need to.
Wipe the rim of the jar with a clean cloth dipped in vinegar, and put the lid on.
Next, I’ll put the canner on the stove and put the water from heating the lids into the canner to the correct depth and turn it on high. Then I put the jars in.
The Steamy Part
Now I put the lid on the canner, making sure that it is locked. As the water begins to boil steam will start coming out of the air vent pipe.
Once a steady flow of steam has been achieved, I start my timer. For my canner, steam has to exhaust for 5 to 10 minutes if I’m canning at 5 or 10lbs, and 5 minutes for 15lbs.
Once the steam has exhausted for 10 minutes, I put the regulator on the vent pipe. Once that is on, the pressure will begin to build inside the canner.
As it gets close to the correct pressure for what I’m canning (6lbs in this case), I reduce the heat. For food safety reasons, the pressure has to hit 6lbs and stay there for the whole processing time.
And if it does go under the proper pressure, you have to get it back up to pressure and begin your processing time again.
It’s OK if it’s over but not under. But too much pressure can cause texture issues with some foods, so I don’t want it to get too high.
It’s also dangerous to let the canner build up too much pressure. So just stay around and keep an eye on it.

Note about Heating Elements:
Some heating elements respond more quickly than others when you adjust them. Gas responds quicker than electric, and the smooth top stoves (at least the one I had) are the least responsive.
If you need to, remove the canner from the heat source for a few minutes if the pressure is getting too high. Over time you will learn how to best regulate the pressure with your stove and your canner.
Do try to avoid extreme pressure swings up and down, though. That can cause excessive loss of fluid in your jars.
The proper pressure for processing my plums is 6lbs. Once that has been reached, I begin my processing time of 10 minutes.
Post-Process
After my 10 minutes of processing time I’ll remove the canner from the heat. A pressure canner needs to cool off on its own to slowly come back down to normal pressure.
DO NOT COOL THE CANNER OFF WITH WATER.
DO NOT TAKE THE REGULATOR OFF THE CANNER.
I know, I know. Again with the shouting.
But it’s really important!
That could cause your jars to explode and/or your canner to warp. Just let it sit, undisturbed.
Your jars inside the canner haven’t sealed yet, so you don’t want to move it around too much. That could compromise your seal integrity.
My canner has an air vent/cover lock (weird name, huh?) that drops when the pressure is completely reduced. When that drops I tilt the regulator to make sure that no steam escapes.
If that’s good, I remove the regulator and wait another 5 to 10 minutes before removing the lid.
From the time I remove the canner from the heat until I can remove the lid takes about 20-30 minutes depending on what the pressure was.
When you remove the lid, it’s still really hot inside, so open the lid away from your face.
And when you remove the jars they will still be boiling so be careful.
Use the jar lifter and lift the jars straight up out of the canner. The lids are not sealed yet and tilting will allow the liquid in the jars to escape and possibly compromise the seal.
The jars need to be put on a few layers of towels out of any cold drafts to cool.
The jars will sit undisturbed for a minimum of 12 hours and maximum of 24 hours before I check the seals.
If any of them don’t have a seal after that time I’ll put it in the fridge and eat it for dessert.
Those that are sealed will be washed and labeled and put in the pantry.
And that’s all there is to it. It sounds like a lot but it’s really not.
That wraps up our little pressure canning tutorial. Just remember, keep calm & process on!